Photoshop Tutorials: Create an Artistic Photo Manipulation of a Girl in a Red Field | |

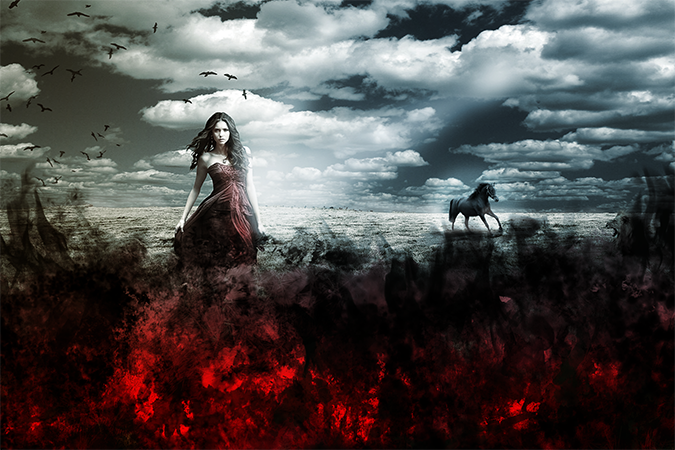
| Create an Artistic Photo Manipulation of a Girl in a Red Field Posted: 13 Aug 2012 12:47 PM PDT Preview of Final Results
Girl in the Field Photoshop TutorialTutorial ResourcesStep 1Open file “Field” and using the Quick Selection Tool (W) make a selection of the ground. Press Ctrl + J to make a new layer from selection and add a Curves Adjustment layer to tone it down a little.
Step 2Open file “Sky” and using the Quick Selection Tool (W) make a rough selection of the ski. Press Ctrl + C to copy then paste it with Ctrl + V in our scene. Move this layer below the “Ground” layer. Press Ctrl + T to free transform this clouds layer like shown in the image below and apply a Color Balance adjustment layer to lower the intensity of the blue color.
Step 3Open file “Girl” and Ctrl + click on the “Layer 0″ to select the opaque pixels. Copy (Ctrl + C) then paste (Ctrl + V) into our scene. Use Free Transform (Ctrl + T) to size and position the girl like shown below. The girl will be our point of interest in this scene. Notice that I didn’t place her in the middle but to the left side of the image, at about one third from the left and two thirds from the right. Placing your key elements or points of interest like this makes your scene more dynamic and interesting. This is called “the rule of thirds” and if you are serious about composition you should search for thorough information about it.
Step 4Our girl is a bit dark for the scene so let’s adjust this by adding a Curves Adjustment Layer and dragging the curve upwards. Alt + click in between the Curves layer and the “Girl” layer to clip the Curves layer to the “Girl” layer (by doing this we apply the Curves Adjustment Layer only to the “Girl” layer, without affecting other layers). Because I am writing this tutorial after I finished my scene I know that a beam of light will hit the right side of the girl. A blue beam of light. So to make the scene look more convincing we should modify the colors and the right side of the girl’s body accordingly. Make a new layer (Ctrl + Alt + Shift + N) and clip it to the girl layer (or in this case to the Curves Adjustment Layer, which is already clipping the girl layer) and using a light blue color (#aeccff) paint with a round soft brush at 10% opacity the right side of the girl. Change the layer’s blend mode to Color Dodge and lower the opacity to 80%. Select a light red color (#df1314) and repeat the procedure above, but this time on the left side. Notice that I group my layers to keep them nice and tidy. I will not tell you at every step to group the layers but it is a good practice and can make future modification much easier.
Step 5Adding direction lights it’s easy. First select the Pen tool and make a polygon like below. Press Ctrl + Enter to transform the path into selection and fill this selection with white (Shift + F5 and choose white from the drop-down menu). Press Ctrl + D to deselect and apply a 50-60px Gaussian Blur. Lower the opacity to 50%. Now to give our light a blue color make a new layer (Ctrl + Alt + Shift + N) and select the same color as in the step 4 (remember the color we applied to the right side of the girl? -#aeccff). Now with a round soft brush at 10-20% opacity brush once or twice over the beam of light. Alt + click in between the color layer and the light layer to limit the blue color only to the beam of light. Make yet another new layer and using a soft round white brush at 10-20% opacity dab once or twice where the source of the light should be. All you have to do now is to group these light related layers and free transform the group as a whole to arrange the lights. For our scene I added a second beam of light. If the after repeated Free Transforms you get hard edges of light, simply paint them away in the layer mask using a round, black soft brush. Clipping layers is a very important concept to know if you want to do anything decent in Photoshop so go ahead and study the help file or search for addition information on the Web because I will not be covering this in the present tutorial.
Step 6In this step we will make the red fire at the bottom of our scene. Import the “Fire” brushes with the Preset Manager and make a new layer (Ctrl + Shift + Alt + N).Place this layer on top of all other layers and select a light red color (#fc1221) as a foreground color and black as background color. I will be naming this layers from 1 to 9 to make it easier for you to follow. Your results will probably be different than mine and it is perfectly normal. Don’t forget to vary the size of the brush at each layer and to select from different brushes to avoid uniform results. If the brushes in the resources are not enough than you can search for addition fire brushes on deviant art or in other places on the web. Paint with red an black on layer 1. Paint with red and black on layer 2 and change the blend mode to Multiply. Paint with red on layer 3 and change the blend mode to Overlay. Paint with red on layer 4 and change the blend mode to Color Dodge. Paint with black on layer 5. Paint with more black on layer 6. Paint with black on layer 7 and change the blend mode to Vivid Light. Add a layer mask and using a black fire brush mask away the region below our girl. To make the flames even more interesting let’s add some texture to it. Open file “Texture” and press Ctrl + A to select all and Ctrl + C to copy. Paste it into our document (Ctrl + V) and change the blend mode to Vivid Light. Lower the Opacity to 61% and the Fill to 28% and add a layer mask. Mask away all but the fire area.
|


| You are subscribed to email updates from Photoshop Tutorials To stop receiving these emails, you may unsubscribe now. | Email delivery powered by Google |
| Google Inc., 20 West Kinzie, Chicago IL USA 60610 | |
No comments:
Post a Comment